You have decided to install solar panels on the roof of your house. Where do you start? Should you call a solar panel installer for an estimation, project, and price? It is the first step that you cannot avoid. What you can avoid is going into that project unprepared.
How to estimate cost of instaling solar panels on roof
No matter what your monthly or annual electricity consumption is, you will get some profit from the investment of solar panels on the roof of the house. The questions are: How much and the time period of repayment of the investment? Let’s assume that you have an ideal roof partially facing south and that your roof is north of the equator (North America, North Africa, Europe, and Asia). Otherwise (Australia, South America, and South Africa), the roof should face north. Let’s also assume that the pitch of the roof is good—no more than 50 degrees. And let’s assume that there is no large object nearby that would cast a shadow on your roof. We need a clear space on the east-south-west surface, as seen from our roof. Once these conditions are met, you can consider making the investment.
A very important step is to decide whether you want an off-grid or on-grid installation. On-grid is more convenient because it does not require a battery or control charger. Of course, recently, hybrid systems that allow you total energy independence have become very popular. Hybrid systems include everything.
Using application SPAC for cost calculation
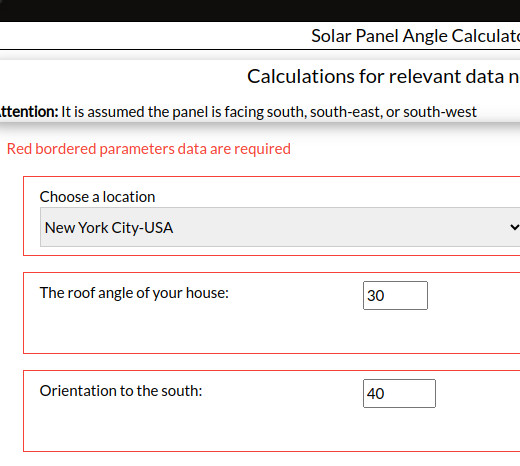
The SPAC (Solar Panel Angle Calculator) application is intended for exactly this purpose. Cost calculation of the installation of solar panels and annual energy gain. I’ve already written a lot about that; I’ll just repeat it briefly. The app has four versions: North America, Asia, Europe, and North Africa. Northern means all major cities north of the equator. In the main window of the application, we enter the three most important data points: Location: New York, roof slope 30 degrees and orientation towards southwest -40 degrees.
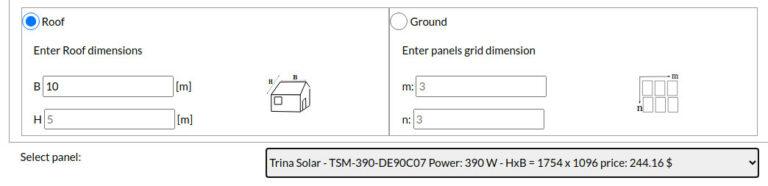
Then it is important to check the calculation for the roof and enter the dimensions of the roof. It remains to choose solar panels for installation. Select from the drop-down menu those that have a price highlighted in red. Now everything is ready for calculation, and we can press the “Calculate” button.
arameters dor New Yor south west orinted roof, tile 30 degree
The roof dimensions and solar panel selection
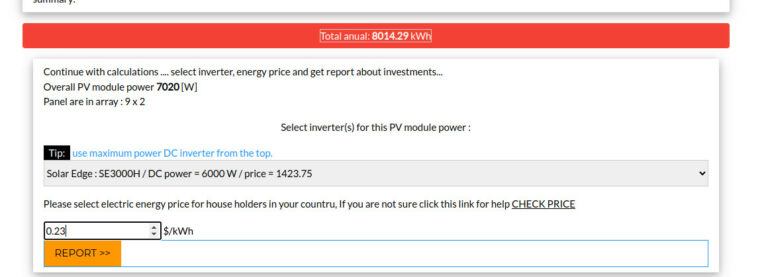
In the next display, we get the basic data: declination, ideal angles, and various tables used for calculations. We skip all that; we scroll until we reach the real data estimation table. We see that the percentage of utilization of the roof is 63%, and the expected annual production is 8014 kWh. Total power of all solar panels. According to it, we will dimension the inverter and choose it, for example. And finally, you need to enter the price of electricity per kWh. You can find it at this link: and for New York, it is 0.23 USD.
Choosing an inverter at an electric price
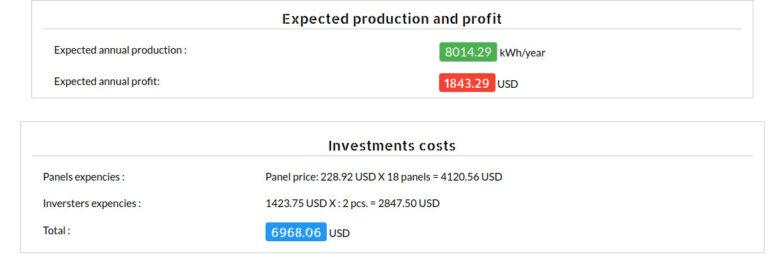
When we have selected the inverter and entered the electricity price, select the Report button. There we see that the expected annual production, the expected annual profit, and the total investment in panels and inverters are 6968 USD. Now let’s see what else we need from the fixing equipment for the roof and electrical installation.
Final results
Rails, connectors and clamps for attachments
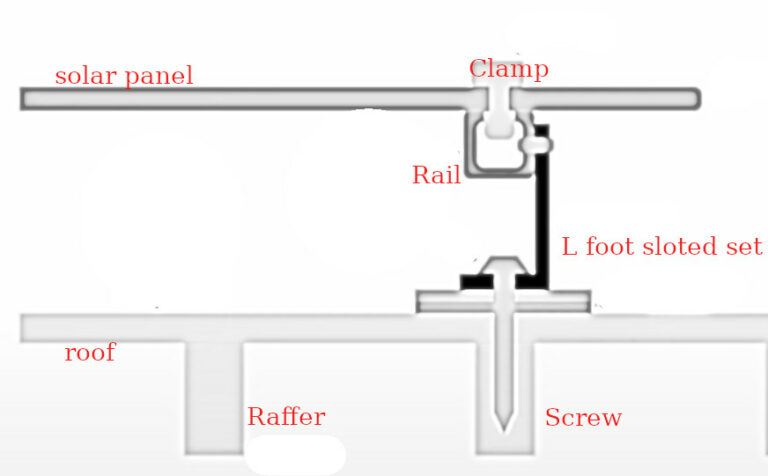
Depending on the type of roof, we will need different elements for fixing the solar panels. Tiles and tin plates usually cover the roof of the house. We will need fastening elements. The most important elements are cross-rails and attachments. The solar panel support is usually 2100 mm long with cross rails. Made of anodized aluminum with special grooves on the sides and top, it is ready for a secure grip on the panel holder. The grooves on the rails are specially made to accept the solar panel holder without any drilling, cutting, or improvisation. Also, the rails can and must be continued with rail connectors.
Roof rail attachment schema
Therefore, there is practically no limitation on the length of the rails. The rail does not represent a functional unit, but it is necessary to use other elements. The price per piece is 12.6 USD. The panel dimensions of our chosen panel are 1765mm x 1096mm. For our configuration, a series of 2 panels in a row of 9 columns, we need 4 rows of rails with a total length of 10 m, a total of 20 rails. Total $252. The rails are attached to the roof with an L-foot slotted set, consisting of a screw that is screwed into the structure, an L profile, and a fixing screw. This rail holder is specially made of anodized aluminum with a special wedge that simply and easily fits into the channel on the rail and ensures a secure grip on the panel. Cross-rail mid-clamp It is used for attaching two solar panels. It is mounted on a rail. It is made of anodized aluminum with a special wedge that simply and easily fits into the channel on the rail and ensures a secure grip on the panel. In total, we will need 44 L-foot slotted sets and cross rails. The total cost is $476.32.
Electric components: Wires, switches, and junction boxes
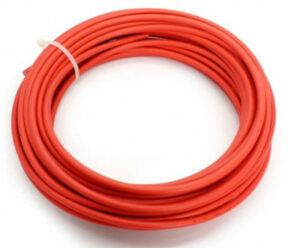
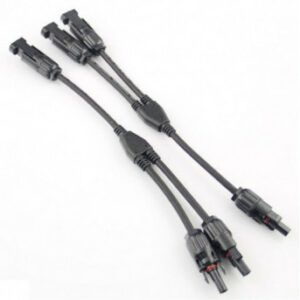
Electricity and electronics are needed for our on-grid system. On-line monitoring of the operation of the solar power plant: communication device, for example, Huawei Smart Dongle Reliable wireless communication makes the installation more practical and flexible. It is a default part of every modern on-grid installation. User interface for Android and iOS operating systems; automatic IP address setting. Plug and play. Price: $83.52. It has automatic IP addressing and plug-and-play. Box with protective equipment: complete protective equipment for overvoltage and undervoltage, frequency protection. Price: $250. Set of solar cables and connectors for a distance of 20 m from the solar panels to the inverter. For this purpose, a single-core, double-insulated cable (4 mm) suitable for MC4 connectors (male and female) with protection against UV radiation, water, moisture, flame, and atmospheric influences is sufficient. The expected lifetime of a solar cable is 25 years. The price is $1/m2. Cable connectors with MC4 connectors are $6 each. One for each panel. Other elements (junction box, ground cable, and ground strap) do not exceed the price of 50 USD. I have not listed all the elements.
The total price for mechanical and electrical equipment is $ 476 +$461 = $937.
Solar cable
MC4 cable connector
MC4 connectors
Safety first; dont forget
Working at heights above 3 meters requires training. Falling from a height during construction work causes more than 50% of deaths, which occur during construction due to carelessness and inadequate protection. Precautionary measures must be observed in each case, regardless of the height, to address the danger of falling from a height. Fall protection on the construction site includes a whole set of equipment adapted to the work of craftsmen and their protection, so if you yourself do work that includes work at height, the equipment you must have is: a belt for working at height, absorbers, ropes, and carabiners. automatic brake. Safety equipment for working at heights must be available on every construction site, which should be taken care of by the contractor, while the workers themselves should never approach risky work at heights without the mentioned equipment. In addition to equipment for working at height, workers on the construction site must be fully equipped, which includes work boots, respiratory protection equipment, head, face, and hearing protection, as well as other work and protective clothing. It is also important that complete work shoes are an integral part of the worker’s equipment. Not all of us are inclined to work at heights. This is what professional solar panel installation companies count on. Work at the highest level: training, equipment, and experience. That doesn’t mean you can’t try to install solar equipment on your roof yourself, but keep in mind that the process will be slow and labor-intensive.
Total costs
Panels and inverter
6968
Attachment and electric
937
Summary
7905
Panels and inverters
0%
Attachmets and electric
0%
Conclusion
If you want to do your own solar installation on the roof of your house, it is doable, provided you are not afraid of working at heights and have some knowledge of electrical engineering and construction. This includes work on the roof: drilling, screwing supports, leveling, adjusting, pulling, and connecting cables. Otherwise, you can hire a subcontractor. With the help of the SPAC application, you can calculate the investment and profit and enter the solar energy business with this prior knowledge.
You can find a lot of videos on you tube (Do It Yourself) installation. But, I strongly reccomand this video- Chears.
CHECK WHAT IS HOT
Our sail checker is searching for solar components that are currently on sale.